Hi All, Our website moved to a new URL. Please bookmark the new link: https://ns2bloggers.blogspot.com/

Friday, 24 July 2015

DRIVER LESS CARS...........TESTING STARTED......!!!!

Imagine a town with crosswalks but no pedestrians, cars and trucks but no drivers. Welcome to Mcity, a fake "town" built by researchers who are testing out the driverless cars of the future.
The controlled test environment, which opened today (July 20) at the University of Michigan (U-M) in Ann Arbor, covers 32 acres (the size of about 24 football fields) and contains all the trappings of a real suburb or small city. There is an entire network of roads lined with sidewalks, streetlights, stop signs and traffic signals. There's even a "downtown" area complete with fake building facades and outdoor dining areas.The idea behind Mcity is simple: test out new driverless car innovations in a human-free environment before these technologies are unleashed in the real world."Mcity is a safe, controlled, and realistic environment where we are going to figure out how the incredible potential of connected and automated vehicles can be realized quickly, efficiently and safely," Peter Sweatman, director of the Mobility Transformation Center (MTC) at U-M, said in a statement.
The roads of Mcity are built to stand up to "rigorous, repeatable" testing, according to MTC officials. While Mcity drivers don't have to contend with real pedestrians, there will be one mechanical foot-traveler (a robotlike machine named Sebastian) that steps out into traffic to see whether the automated cars can hit the brakes in time. The simulated city also features a traffic circle, a bridge, a tunnel, some unpaved roads, and even a four-lane highway with entrance and exit ramps, according to a report by Bloomberg Business.
In addition to evaluating fully automated, or driverless, cars, the researchers also hope to test out so-called connected vehicles within Mcity's limits. Connected cars can either communicate with one another (vehicle-to-vehicle control, or V2V) or with pieces of equipment, such as traffic lights, that are located near roadways (vehicle-to-infrastructure control, or V2I).
Even the smallest details of Mcity have been planned out in advance to replicate conditions that connected and automated vehicles could face in the real world. For example, there are street signs covered up with graffiti, and faded yellow and white lane markings line the streets.
Mcity is just one part of a much larger project that MTC and its partner organizations are establishing in an effort to get a whole fleet of connected and driverless cars on the road in Ann Arbor by 2021. In addition to the fake city, MTC is also continuing to launch connected and semi-autonomous cars on real roadways. Eventually, the University of Michigan and the Michigan Department of Transportation said they hope to put 20,000 connected cars on the roads of southern Michigan.

Courtesy: livescience

Thursday, 23 April 2015

CONTROLLED DELAY ACTIVE QUEUE MANAGEMENT IN NS2

Hi Guys,
 Controlled Queue Delay is a modern AQM mechanism for solving buffer bloat[Persistently Full Buffer Problem]. The solution for persistently full buffers, AQM (active queue management), has been known for two decades but has not been widely deployed because of implementation difficulties and general misunderstanding about Internet packet loss and queue dynamics. Unmanaged buffers are more critical today since buffer sizes are larger, delay-sensitive applications are more prevalent, and large (streaming) downloads common. The continued existence of extreme delays at the Internet’s edge can impact its usefulness and hamper the growth of new applications.

This article aims to provide part of the bufferbloat solution, proposing an innovative approach to AQM suitable for today’s Internet called CoDel (for Controlled Delay, pronounced like “coddle”). This is a “no-knobs” AQM that adapts to changing link rates and is suitable for deployment and experimentation in Linux-based routers (as well as silicon).

In this post, we providing patch codes for CoDel along with ns2 versions.

To download patch, Click here
To download ns2, Click here

>> First untar ns2 and change directory to ns-allinone-2.35
>> Copy patch file into the folder and type following command in terminal
patch -pl < CoDel-ns-2.31.patch 
>> Then, Configure, Make & Install

For more, Click here

Friday, 6 February 2015

TOUR DE NS2: REVEALING PROGRAMMING STYLE

Friends,
Today we are going to have a look in why we run ns2 program as "ns program.tcl"?
Before that we have to go through basic C++ programmings in ns2.Consider a basic C++ instruction only program i .e for example; we are considering a program to calculate time taken for a packet travel from uppermost node to lower most node with the time taken to travel packet between each nodes (t) are constant (say t=1ms) and the number of nodes as n. (say n=10). And we have to find out overall time taken to reach packet to lowermost node. The C++ program new.cc is given below and after compiling we get a executable file "new".
//new.cc
main(){
float time = 0 , t = 1;
int i, n = 10;
 for(i = 1; i < n; i++)
time = time+i ;
printf("Overall time is  %f seconds.\n",time);
}
Now we execute the program from terminal, we can see the following results;
>> ./new
Overall time is 10.0 seconds.
But this programming style is not perfect. If the time to reach packet from one node to another is different and the number of nodes are changed then every time we have to change C++ program. To avoid this we can use input arguments. If we have more that one or two inputs we can provide it from terminal by using input arguments. For that normally we use argc and argv commands. The variable argc shows the number of input arguments and the variable argv contains all the inputs needed for programmer. The following C++ program shows it.
//new.cc
int main(int argc, char* argv[]) {
float time = 0, t = atof(argv[0]);
int i, n = atoi(argv[1]);
for(i = 1; i < n; i++)
time = time + i ;
printf("Overall time is %f seconds\n",time);
}
Now we execute the program from terminal, we can see the following results;
>> ./new 1 10
Overall time  is 10.0 seconds.
>> ./new 3 8
Overall time  is 24.0 seconds.
This programming scheme also have flexibility problem and which is inconvenient as input increases. So we went for most convenient form of  programming using configuration file. In this scheme the input data is used to pick input arguments. Consider a C++ program new.cc with configuration file con.txt and Function readArgFromFile(fp,a) reads the configuration file associated with a file pointer “fp,” and sets variables.
//new.cc
int main(int argc, char* argv[]) {
float time = 0, t[9];
FILE* fp = fopen(argv[1],"w");
int i, n = readArgFromFile(fp,a);
for(i = 1; i < n; i++)
time = time + i ;
printf("Overall time is %f seconds\n",time);
fclose(fp);
}
//con.txt
Number of node = 10
Time = 1 4 3 5 2 7 9 5 3
Now we execute the program from terminal, we can see the following results;
>> ./new con.txt
Overall time  is 30.0 seconds.
By modifying that con.txt file, we get various results.

Now we are looking towards the ns2 and i hope you all get some clue about what i am talking too. In ns2, we know that program is run by using command "ns programname.tcl". The TCL file programname.tcl is used as the input argument providing configuration file and  “ns” is a C++ executable file that generate after compiling using make and install function. The input configuration file specifies system parameters and all other configurations related to it.

I hope you all get it. 
Stay tuned for more updates........!!!!!!!!!

Thursday, 5 February 2015

TOUR DE NS2: REVEALING SECRETS BEHIND COMMAND "MAKE" AND "MAKEFILE"

Friends,
We are decided to introduce a new segment in our blog named as "ToUr De Ns2" to get you more familiar with ns2 directories, folders and commands that we used in the ns2. We hope it gives you all a deep knowledge in ns2. We need all your supports and prayers. Comments and new ideas are welcomed.

Now we are going to have a deep look in command make. We all know that ns2 is a research tool. So all of the researchers are tried to customize files or to add new C++ modules in ns2 directory. During this time, it is necessary to recompile all the files that related or depend with it. So we need an effective command for recompilation of all files because manual recompilation is not possible. For that we here use a UNIX utility tool called as "make". This command has a significant role in development process. It keeps track of all the files created throughout the development process. By keeping track, it recompile the inter dependencies exist among these files; which may have been modified. The command syntax that we write in terminal to call is;
 make [-f filename]
Here make command recompiles the source code according to the descriptor file "filename" and the descriptor file is optional. So the command inside bracket is optional. By default the descriptor file is "Makefile". So if we not provided the filename, command automatically consider Makefile as descriptor file.

DESCRIPTOR FILE: MAKEFILE:

This file contains the name of source codes that have to execute, their inter dependency and how the file is to recompile. These things are specified using a specific dependency rule or by using a particular arrangement code names called as dependency rule. It contain three components; target,depfile&command
The syntax is given as;
<target1> [<target2> ...] : <depfile1> [<depfile2> ...]
<command1> [<command2> ...]
Here, the target file is the file which is needed to be compile and depfile are the files which are dependency file which is specified after semicolon(:) and also file inside bracket are optional ones. And the line below that shows the command that to regenerate the target file.
Example: 
# makefile of channel
OBJS = main.o
COM = cc
channel : ${OBJS}
${COM} -o channel ${OBJS}
main.o : main.c
${COM} -c main.c
clean :
rm ${OBJS}
Here, the target file is channel and that depends the file main.o and which is showed in third line and on the forth line the command showed to execute the recompiling. And the process repeats in the following lines. Final two line shows the clean function which is used to clean the dependency object file that are not neede after the recompilation. The UNIX command “cc -c file.c” compiles the file “file.c” and creates an object file “file.o,” while the command “cc -o file.o” links the object file “file.o” and create an executable file “file.”.

NS2 MAKEFILE:

Makefile in the ns2 is located in the ns2.xx directory and while we open it we can see the details of files needed to recompile. And in that file, we can mainly see the following keywords;

  • INCLUDES = : The files or items that seen inside this category is to be seen in ns2 environment.
  • OBJ_CC = & OBJ_STL = : It constitute the entire ns2 object files.
  • NS_TCL_LIB = : We have to add the Tcl files of  ns2.
If a new C++ module is developed, then its corresponding object file name with “.o” extension should be added in OBJ_CC and OBJ_STL and Tcl file name should be added NS_TCL_LIB.

If you created a new C++ module with corresponding files .cc,.h and .tcl (say new.cc,new.h and new.tcl) and also created a new folder new inside the ns2 directory. After this we have to to the following;
1. Include a string “-I./new” into the Line beginning with INCLUDES = in the “Makefile.”
2. Include a string “new/new.o” into the Line beginning with OBJ_CC = or OBJ_STL = in the “Makefile.”
3. Include a string “new/new.tcl” into the Line beginning with NS_TCL_LIB = in the “Makefile.”
4. Run “make” from the terminal.
After running “make,” an executable file “ns” is created and this file “ns” to run simulation.

Continue with a new topic in following posts......!!!!
Thank You.
Have a Nice day.

Wednesday, 4 February 2015

STATISTICAL ANALYSIS USING RANDOM SETTINGS IN NS2

While running ns2, we always get the same results as much we run with the same parameters. If we need to get different results for running with same parameters,we need to add some random property in our scripting. By using this property, we can check what goes wrong at an exact point. Normally in ns2, simulations are under three categories;

DETERMINISTIC SETTING

This setting is the default setting of ns2 and we get the same output in every run. This simulation scenario is usually convenient for debugging process and to locate errors that occurred in simulation codes or to study about complex nature of networks. So while running in deterministic setting, we will get same results on every time and which helps easy to analysis.

RANDOM SETTING

In case of a statistical analysis, we are forced to simulate a simulation scenario several times and to find out mean & variance. By using deterministic setting we are not able to do this because the variance is zero for that. So we have to provide randomness with every simulation running. This is done by using RNG [Random Number Generator]. This randomness is in two forms;

Single Stream Random Setting

By default, ns2 always have defaultRNG with seed value one(1). To provide randomness, we have to seed different simulation runs differently. In single stream random setting, we need only one RNG and we set different runs with different outputs by providing different values of  "k". i.e;
$defaultRNG seed <k>
and random generator use this seed value <k> as seed for generating randomness.
TCL SCRIPT:
$defaultRNG seed 101
set arrivalRNG [new RNG]
set arrival_ [new RandomVariable/Exponential]
$arrival_ set avg_ 5
$arrival_ use-rng $arrivalRNG
puts "Inter-arrival time Packet size"
for {set j 0} {$j < 5} {incr j} {
puts [format "%f " [$arrival_ value] ]
 }
OUTPUT:
Inter-arrival time
.056 
.234 
.090 
.678 
.456 
DESCRIPTION:
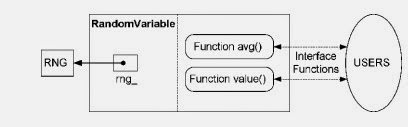
Here, a exponential random variable arrival_ is created and its parameters are provided in the following line. For specifying a RNG, we use OTCL command use-rng and to print the result we used command value.
Schematic Diagram

 Multiple Stream Random Setting

If we need more than one variable to provide randomness in simulation runs,we have to create different set of new RNG as per our requirements.

REFERENCE: 
Introduction to Network Simulator NS2 by Teerawat Issariyakul • Ekram Hossain; 2nd Edition

Monday, 2 February 2015

GREP FUNCTION: EASY SEARCH COMMAND

Friends,
     Now we are trying to explain a Linux command which helps you a lot in your researches. Its nothing but a simple command called as GREP. It is a powerful command which helps you to search a particular string or words from a file or from a folder and also in some cases it helps during trace file analysis.

SYNTAX

Here the syntax is;
grep <option> <string> <filename>

Here, this command search string within the file named as filename. If it is not given, then the command waits for the input from the keyboard and search for string.  For more about this Click here 

There are two important notes for <string>
  • If it contains a white space,  embrace it with quotation marks ("")
  • If it contains a special character such as “ or &, you can suppress it using backslashes (\” or \&)  to indication that this is a character
For example, If u need to search a word "apple" in a file named as word.txt. Then;
grep apple word.txt
In case of searching words in sub directories, Simply write as; 
                                                                      grep -r apple *

If you want to look a function is available with ns2 folder or not, simply you can search by using this command. For example if you want to find function  className::rt_resolve(ReturnType variableName)
You can find this function using grep:  grep -r ::rt_resolve( *


In case of searching a string with special character "&hdr_aodv", we can search it as;
 grep -r \&hdr_aodv *


if you’re interested only in the ns-2.35/aodv directory. Now ypu can search by using this:
grep rt_resolve aodv/*.*

Now you can filter the search by providing  the files extension along with the search.For example;
grep rt_resolve *.h  searches rt_resolve in .h files only.

While in the case of trace file analysis we can use it as follows;
cat out.tr | grep " 2 3 cbr " | grep ^r | column 1 10 | awk '{dif = $2 - old2; if(dif==0) dif = 1; if(dif > 0) {printf("%d\t%f\n", $2, ($1 - old1) / dif); old1 = $1; old2 = $2}}' > jitter.txt
This means that the "CBR packet receive" event at n3, selects time (column 1) and sequence number (column 10), and calculates the difference from last packet receive time divided by difference in sequence number (for loss packets) for each sequence number. i .e  for selecting particular value we can use this.


Sunday, 1 February 2015

MOVE AND SUMO INSTALLATION FOR SIMULATING VANETS

For simulating a VANET , we need Simulation of Urban MObility and MOVE softwares.SUMO softwares creates the road maps, edges,curves and vehicle movement with the help of MOVE software.So we have to install both software and also need java development kit(jdk) for supporting MOVE software

MOVE INSTALLATION

1. First you have to install jdk,for that open terminal and write following commands;  
                                          $ sudo apt-get purge openjdk*  
                                         $ sudo add-apt-repository ppa:webupd8team/java
                                        $ sudo apt-get update
                                       $ sudo apt-get install oracle-java7-installer

2. After installing JDK 7 go to following link to download MOVE [Fill the data]
3. Download the  MOVE.JAR  file.
4. Open the application using JDK [otherwise right click and click properties set JDK as default]

SUMO INSTALLATION

1. Download software from this link; SUMO
2. Now install SUMO and for that click here

For more; click here