Hi All, Our website moved to a new URL. Please bookmark the new link: https://ns2bloggers.blogspot.com/

Sunday, 11 May 2014

VISUALIZING TRACE FILE DATA WITH GnuPlot


Gnuplot is a portable command-line driven graphing utility for Linux, OS/2, MS Windows, OSX, VMS, and many other platforms. The source code is copyrighted but freely distributed (i.e., you don't have to pay for it). It was originally created to allow scientists and students to visualize mathematical functions and data interactively, but has grown to support many non-interactive uses such as web scripting. It is also used as a plotting engine by third-party applications like Octave. Gnuplot has been supported and under active development since 1986. 
Gnuplot can be used to visualize the trace file data; several network parameters can be plotted using this Gnu plot..for more details click here

Saturday, 10 May 2014

SCRIPT TO FIND DESTINATION AND ENERGY OF NODES

Here we created a script to print final position of node and energy of nodes in your terminal.We hope it is useful for you all....!!!!!!

For script and details, Click here 

Screenshot:


Tuesday, 6 May 2014

ADDING NS2 IN ECLIPSE

Now a days,running ns2 codes over ns2 is very useful and easy.If u want to speed up your programming and also you do not want to waste your time to remember Classes/APIs/Functions, do not want to waste time to open/close/reopen files, switch files back forth and finally, if you want to understand the code architecture better and quicker, you should use some good environment i.e IDE. In windows,the better IDE is visual studio.But in case of NS2,it is better to use Eclipse as the IDE for both linux and windows.In here we are explaining installation and working of Eclipse indigo and for ns2 versions (ns 2.31 to ns 2.35).

INSTALLATION OF ECLIPSE:

STEP 1: First,we have to download eclipse.And for that ,please go through following link;

                                              ECLIPSE DOWNLOAD

STEP 2: After downloading,open folder.It was normally in compressed format,so we have to extract it.Extract the IDE to a folder.

STEP 3 : Now download CDT from following link.
                                                  CDT DOWNLOAD

STEP 4: Now open Eclipse,go to help and then to install new software [Help--> Install New Software].A window with name "install" will pop up. Then go to Add. Put the values as shown below.

    Name:- CDT
    Location:- Browse to the "cdt-master-6.0.2.zip" file.

STEP 5: Check "CDT Main Features" and "CDT Optional Features", click next, then accept license and finish. At last it will ask you to restart Eclipse, then choose Restart.

CDT stands for “C/C++ Development Tooling”
If you do not have a working internet connection in the system you have installed Eclipse, instead of steps 4 and 5, download the CDT from the above mentioned site. Then move to Install New Software (STEP 4) -> Add and add the archive downloaded.

STEP 6: Now,install ns2, Download ns2 form here and then Extract NS-2 to a folder, i.e. /home/username/ns-allinone-2.35

Edit Makefile :

1. Open “…/ns-allinone-2.35/ns-2.35/Makefile.in” and

2. Add "-g" to the line CCOPT = @V_CCOPT@ as follows
                              CCOPT = @V_CCOPT@ -g

3. Add -DNDEBUG -DDEBUG to the end of the following line:
DEFINE = -DTCP_DELAY_BIND_ALL -DNO_TK @V_DEFINE@ @V_DEFINES@       @DEFS@-DNS_DIFFUSION -DSMAC_NO_SYNC -DCPP_NAMESPACE=@CPP_NAMESPACE@-DUSE_SINGLE_ADDRESS_SPACE -Drng_test -DNDEBUG -DDEBUG

4. Navigate to …/ns-allinone-2.34/ns-2.34 and run “./configure”

5. Navigate to the NS-2 folder using terminal and type ./install

6. Also, follow the instructions are displayed at the end of a successful installation. These instructions are to modify the PATH variable and other environment variables as needed.

7. You may encounter compilation troubles, due to the DEBUG flag being enabled. My experience was that several printf statements needed to be disabled (commented out):
                   mobile/shadowing-vis.cc line 293
                   aodv/aodv.cc line 210
                   aomdv/aomdv_rtable.cc line 186
                   aomdv/aomdv.cc line 283

ADDING NS2 IN ECLIPSE

STEP 7: Now once again open eclipse and set the workspace as the ns2 installation path (/home/user/ns-allinone-2.35) by selecting File -> Switch Workspace.

Choose File -> New -> Project -> C++ Project.

Select Project Type as Makefile Project -> Empty C++ Project.
            1. Toolchains: Linux GCC
            2. Enter Project Name as ns-2.34

Uncheck “Use default location” then browse to the directory NS-2 source directory ( …/ns-allione-2.35/ns-2.35 )

In Eclipse Indigo, you may not be allowed to create a new project in the existing ns-2.35 subfolder if you uncheck the “Use default location” checkbox. You will not need to, anyway, if you have chosen the parent folder as workspace. In this case, Eclipse will only warn you that you are creating a project in a directory which already exists.

Select “Next” and “Finish”.

From the workspace, Selecting the NS-2 Project and choosing Project -> Build All should not give Error.

Running the project must open the console with the NS-2 prompt, %

SETTING DEBUG CONFIGURATION

STEP 8: Select Run -> Debug Configurations

Choose C/C++ Application. Type in any name.

Under the Main tab, Choose the following:

Project as ns-2.34.

C/C++ Application as ns. (Search Project and Choose this)

Under the Debugger tab, choose GDB Debugger. Uncheck the “Stop on startup at” option.

Apply and Debug.


Saturday, 3 May 2014

IMPLEMENTING A NEW PROTOCOL

Tutorial to implement protoname in ns2.35


This is an Implementation tutorial of new manet(Mobile Ad-hoc NETworks) unicast protocol name protoname.

List of files to be modified

  • ~/ns-allinone-2.35/ns-2.35/common/packet.h
  • ~/ns-allinone-2.35/ns-2.35/trace/cmu-trace.h
  • ~/ns-allinone-2.35/ns-2.35/trace/cmu-trace.cc
  • ~/ns-allinone-2.35/ns-2.35/tcl/lib/ns-packet.tcl
  • ~/ns-allinone-2.35/ns-2.35/tcl/lib/ns-default.tcl 
  • ~/ns-allinone-2.35/ns-2.35/tcl/lib/ns-lib.tcl
  • ~/ns-allinone-2.35/ns-2.35/queue/priqueue.cc

 
** Note: Text in red is the part that is to be added or modified in given file and location and purple colour denotes the terminal commands.

** Note: mod stands for modification.

** Note: Line number is approx and is provided for your convenience. Please check the methods below and above before inserting.

Step 1:

download protoname.rar

http://www.cs.nccu.edu.tw/~g10031/protoname.rar

Extract the files and place them in ~/ns-allinone-2.35/ns-2.35/protoname directory(create the directory if not present)

Step 2:

gedit ~/ns-allinone-2.35/ns-2.35/common/packet.h (mods at 3 places)

  • a.  its somewhere near line 200
static const packet_t PT_DCCP = 63;
static const packet_t PT_DCCP_REQ = 64;
static const packet_t PT_DCCP_RESP = 65;
static const packet_t PT_DCCP_ACK = 66;
static const packet_t PT_DCCP_DATA = 67;
static const packet_t PT_DCCP_DATAACK = 68;
static const packet_t PT_DCCP_CLOSE  = 69;
static const packet_t PT_DCCP_CLOSEREQ = 70;
static const packet_t PT_DCCP_RESET = 71;

        // M-DART packets
static const packet_t PT_MDART = 72;

        // insert new packet types here

static const packet_t PT_PROTONAME = 73;

static packet_t       PT_NTYPE = 74; // This MUST be the LAST one


  • b. near line 250

static bool data_packet(packet_t type) {
return ( (type) == PT_TCP || \
        (type) == PT_TELNET || \
        (type) == PT_CBR || \
        (type) == PT_AUDIO || \
        (type) == PT_VIDEO || \
        (type) == PT_ACK || \
        (type) == PT_SCTP || \
        (type) == PT_SCTP_APP1 || \
        (type) == PT_HDLC || \  //(remember this mod also)
(type) == PT_PROTONAME \ 
       );

  • c.      near line 422
static void initName()
{
                .....
                name_[PT_DCCP_REQ]="DCCP_Request";
name_[PT_DCCP_RESP]="DCCP_Response";
name_[PT_DCCP_ACK]="DCCP_Ack";
name_[PT_DCCP_DATA]="DCCP_Data";
name_[PT_DCCP_DATAACK]="DCCP_DataAck";
name_[PT_DCCP_CLOSE]="DCCP_Close";
name_[PT_DCCP_CLOSEREQ]="DCCP_CloseReq";
name_[PT_DCCP_RESET]="DCCP_Reset";
name_[PT_PROTONAME]="protoname"; 
name_[PT_NTYPE]= "undefined";
}


save and close.

Step 3:

gedit ~/ns-allinone-2.35/ns-2.35/trace/cmu-trace.h (mod at 1 place)

  • a. Near line 164.

class CMUTrace: public Trace {
public:
CMUTrace (const char * s, char t);
...
private:
char tracename [MAX_ID_LEN + 1];
int nodeColor [MAX_NODE];
...
void format_tora (Packet * p, int offset);
void format_imep (Packet * p, int offset);
void format_aodv (Packet * p, int offset);
/ / ----------------------------------------------
void format_protoname (Packet *p, int offset);
/ / ----------------------------------------------
void format_aomdv (Packet * p, int offset);
void format_mdart (Packet * p, int offset);

/ / This holds all the tracers added at run-time
static PacketTracer * pktTrc_;

};
# Endif / * __ cmu_trace__ * /

save and close.

Step 4:

gedit ~/ns-allinone-2.35/ns-2.35/trace/cmu-trace.cc (mods at 3 places)

  • a. Add this line at start

#include <protoname/protoname_pkt.h>

  • b. Near line 1168
void
CMUTrace :: format_mdart (Packet * p, int offset) {
.........
........
........
}

void
CMUTrace::format_protoname(Packet *p, int offset)
{
struct hdr_protoname_pkt* ph = HDR_PROTONAME_PKT(p);
if (pt_->tagged())
{
sprintf(pt_->buffer() + offset, "-protoname:o %d -protoname:s %d -protoname:l %d ", ph->pkt_src(), ph->pkt_seq_num(), ph->pkt_len());
}
else if (newtrace_)
{
sprintf(pt_->buffer() + offset, "-P protoname -Po %d -Ps %d -Pl %d ", ph->pkt_src(), ph->pkt_seq_num(), ph->pkt_len());
}
else
{
sprintf(pt_->buffer() + offset, "[protoname %d %d %d] ", ph->pkt_src(), ph->pkt_seq_num(), ph->pkt_len());
}
}


  • c. Near line 1477
void CMUTrace :: format (Packet * p, const char * why)
{...
switch (ch-> ptype ()) {
case PT_MAC:
...
case PT_GAF:
case PT_PING:
break;
/ / --------------------------------------------
case PT_PROTONAME:
format_protoname(p, offset);
break;
/ / --------------------------------------------
default:
...
}

save and close.

Step 5:

gedit ~/ns-allinone-2.35/ns-2.35/tcl/lib/ns-packet.tcl  (mod at 1 place)

  • a. Near line 172

# Mobility, Ad-Hoc Networks, Sensor Nets:
    AODV     # routing protocol for ad-hoc networks
    Protoname # new routing protocol for ad-hoc networks
    Diffusion     # diffusion/diffusion.cc
    IMEP     # Internet MANET Encapsulation Protocol, for ad-hoc

Save and close.

Step 6:

gedit ~/ns-allinone-2.35/ns-2.35/tcl/lib/ns-default.tcl  (mod at 1 place)

  • a. Add at the last.

# Defaults defined for Protoname
Agent/Protoname set accessible_var_ true


save and close.
Step 7:

gedit ~/ns-allinone-2.35/ns-2.35/tcl/lib/ns-lib.tcl  (mod at 2 places)

  • a. Near line 671

switch-exact $ routingAgent_ {
...
ManualRtg {
set ragent [$ self create-manual-rtg-agent $
}
# / ------------------------------------------------ -
Protoname 
{
         set ragent [$self create-protoname-agent $node]

}
# / ------------------------------------------------ -
default {
...
}


  • b. Near line 2278

Simulator instproc create-omnimcast-agent {node} {
...
}
# / ------------------------------------------------ -----
Simulator instproc create-protoname-agent {node} {
    # Create Protoname routing agent
    set ragent [new Agent/Protoname [$node node-addr]]
    $self at 0.0 "$ragent start"
    $node set ragent_ $ragent
    return $ragent
}

# / ------------------------------------------------ -----
# XXX These are very simulation-specific methods, why should they belon
Simulator instproc put-in-list {agent} {
...
}


Step 8:

gedit ~/ns-allinone-2.35/ns-2.35/queue/priqueue.cc (mod at 1 place)

  • a. Near line 95.
void
PriQueue :: recv (Packet * p, Handler * h)
{
struct hdr_cmn * ch = HDR_CMN (p);

if (Prefer_Routing_Protocols) {
switch (ch-> ptype ()) {
...
case PT_MDART:
/ / --------------------------------------------
case PT_PROTONAME:
/ / --------------------------------------------
recvHighPriority (p, h);
break;
default:
Queue :: recv (p, h);
}
}
else {
Queue :: recv (p, h);
}
}

save and close.

Step 9:

gedit ~/ns-allinone-2.35/ns-2.35/Makefile (mod at 1 place)

  • a. Near line 336

OBJ_CC = \
tools / random.o tools / rng.o tools / ranvar.o common / misc.o common /
...
wpan/p802_15_4trace.o wpan/p802_15_4transac.o \
apps / pbc.o \
# / / ----------------------------------------------- -
protoname/protoname.o protoname/protoname_rtable.o \
# / / ----------------------------------------------- -
$ (OBJ_STL)

save and close.

Step 10:


build it now, changes done ( run these in terminal in ~/ns-allinone-2.35/ns-2.35 directory )

  • a. make clean
  • b. touch common/packet.cc
  • c. make
  • d. sudo make install

(if you are getting some errors check the spaces in the editing you did above)


Step 11:


gedit ~/ns-allinone-2.35/ns-2.35/test.tcl

copy and paste

set ns [new Simulator]
$ns node-config -Routing protoname   
set nf [open out.nam w]     
$ns namtrace-all $nf       
set nd [open out.tr w]       
$ns trace-all $nd             
  proc finish {} {
          global ns nf  nd
          $ns flush-trace 
          close $nf       
          close $nd       
          exec nam out.nam &
          exit 0
   }

for {set i 0} {$i < 7} {incr i} {set n($i) [$ns node] }
for {set i 0} {$i < 7} {incr i} {
$ns duplex-link $n($i) $n([expr ($i+1)%7]) 1Mb 10ms DropTail
}
set udp0 [new Agent/UDP]   
$ns attach-agent $n(0) $udp0
set cbr0 [new Application/Traffic/CBR] 
$cbr0 set packetSize_ 500     
$cbr0 set interval_ 0.005      
$cbr0 attach-agent $udp0
set null0 [new Agent/Null]
$ns attach-agent $n(3) $null0
$ns connect $udp0 $null0 
$ns at 0.5 "$cbr0 start"
$ns rtmodel-at 1.0 down $n(1) $n(2) 
$ns rtmodel-at 2.0 up $n(1) $n(2)   
$ns at 4.5 "$cbr0 stop"
$ns at 5.0 "finish"
$ns run


save and close

ns ~/ns-allinone-2.35/ns-2.35/test.tcl

and boom you are getting the nam (if not sorry troubleshoot once by going through the tutorial again as I am getting the outputs completely and so should you)


The whole credit of this work goes to Francisco J. Ros and Pedro M. Ruiz for their beautiful work and excellent explanation they provide.

ROUTING TABLE GENERATION

We all know that there was no automatic provisioning to generate a routing table for the nodes  in ns2. One of the way to solve this is by analyzing trace file generated by using some high level scripts like awk script, perl script or some other scripts.But it is little complex and also we have good knowledge in that and another way is to generating routing table is by modifying the existing routing protocol.

Here, we are going to generate routing tables for tcl scripts by modifying AODV protocol. For that we have to modify following files in the AODV directory[for AODV directory look at ns2.35 folder];
  1. aodv.h 
  2. aodv.cc

1. aodv.h modification

First display aodv.h file and then add the following lines inside the class AODV in the protected scope Add the line after the rt_down() function.

void rt_print(nsaddr_t nodeid);


Save the aodv.h file and

2. aodv.cc modification

Now click on aodv.cc file and select display option,

Now add the following function rt_print to the aodv.cc file probably below rt_down function.

void  AODV::rt_print(nsaddr_t nodeid) {
FILE *fp;
fp = fopen("route_table.txt", "a");
aodv_rt_entry *rt;
for (rt=rtable.head();rt; rt = rt->rt_link.le_next) {
fprintf(fp, "NODE: %i \t %f \t %i \t %i \n", nodeid, CURRENT_TIME, rt->rt_dst, rt->rt_nexthop);
}
fclose(fp);
}


This function records the routing table entry into the file route_table.txt

The above code ;
  1. Creates a file pointer under append mode.
  2. Creates a pointer to routing table entry.
  3. Process the queue and finally print the values to the file with file pointer fp.
  4. Close the file pointer.

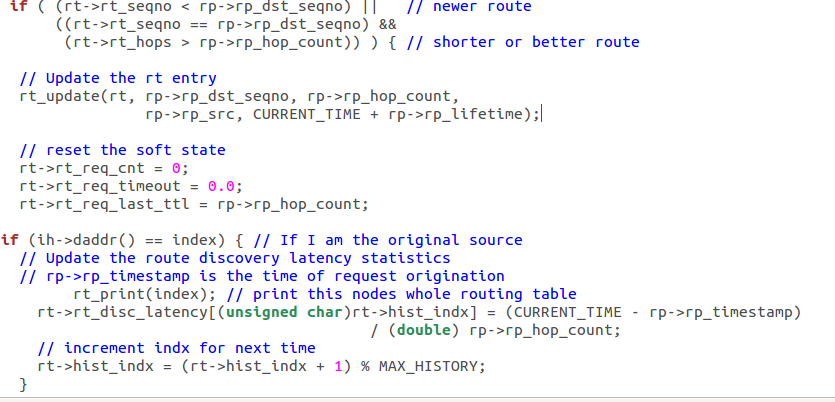
Now finally we have to call the function that we written above,we can call it in any part of protocol. Here we are going to call inside recvReply() function.

For that we have to write following line inside if (ih->daddr() == index);

 rt_print(index);


After completing these steps.Open the terminal window and change the directory to the ns2.35 by using following command.

cd /home/user/Desktop/ns-allinone-2.35/ns-2.35 [change path as yours]

and now type 
                                                                     make clean 
then type
                                                                         make
then type
                                                               sudo make install


After successful completion of steps.Run a sample program.
For AODV,Click here
For sample program,click here  and run the program using command ns filename.tcl

Screen shot of a routing table


Note: File route_table.txt will be saved in the directory where program is located

This post is taken and modified from www.elmurod.net and www.nsnam.com

APPLICATION LAYER SIMULATIONS ON NS-2

A framework named "ns2-app" is developed and maintained by Xizhi Zhu to simplify the application layer simulations on NS-2.

BE CAREFUL, it's only tested on NS2.33 above, but it should work on some older versions as it doesn't change any existing code.

Why this framework

NS2 supports only unreal applications that just contain the length of packets. There do exist some real applications, but they are difficult to reuse, or even restricted to a specific type of applications.
Therefore, we decide to write this framework trying to reduce the difficulty. Also, a P2P framework is to be provided based on it.

Usage

  • The application layer simulation framework
    1. Download the latest source code here, uncompress it into the ~/ns-2.33/ directory, and recompile NS. BE CAREFUL, it will overwrite the original Makefile. But you can also modify the Makefile yourself by adding -I./real-app to the INCLUDES section and real-app/adu.o real-app/wrapper.o real-app/real-app.o real-app/test/test.o to the OBJ_CC section.
    2. Derive a class from ADU to represent the application layer data, and rewrite the size function. The packets are sent by calling the RealApplication::send() function
    3. Derive a class from RealApplication to represent the application, and rewrite the recv function which is called when a packet is arrived.
    4. Derive a class from TclClass to combine the application in C++ with OTcl.
    5. Write an OTcl script to configure the simulation.
  • The P2P application
    1. It's still under development.

The source code can be downloaded from the following link:

Download ns2-app-0.02.tar.bz2
After downloading, untar the downloaded folder in  ~/ns-2.33 directory and recompile NS-2.
For more details on installation and the possible errors, please visit the official website of ns2-app here.

Wednesday, 30 April 2014

OLSR PATCH FOR NS2

UM-OLSR

UM-OLSR is an implementation of the OLSR (Optimized Link State Routing) protocol for the ns-2 Network Simulator. The code is released under the terms of the GNU General Public License (GPL). Due to lack of time this project is not maintained by myself any more, feel free to take over the task of maintenance if you are interested.

UM-OLSR complies with IETF RFC 3626 and supports all core functionalities of OLSR plus the link-layer feedback option. The software has been successfully tested on ns-2, and patches for several versions of the simulator are provided. It is widely employed by the wireless communications research community, as the high number of references in research papers reveal. In addition, it was ported to ns-3 by Gustavo Carneiro (INESC Porto) and to Omnet++ by Alfonso Ariza (Universidad de Málaga). Thus, you can also run OLSR simulations in modern network simulators.
      

Features

Compliant with core OLSR (as described in RFC 3626).
Support for link-layer feedback.
Highly configurable from TCL scripts, i.e., without the need of recompiling the whole simulator. You can:
Activate/deactivate debug mode.
Change the interval at which every message type is sent.
Change nodes’ willingness for forwarding data packets on behalf of other nodes.
Print whatever data structure managed by a node at a certain time.

Download

The source code of UM-OLSR in hosted on SourceForge.net: download.

Contributed patches

Here you can find a sample script for configuring a simulation, as well as some UM-OLSR patches for different versions of ns-2 that were contributed by different people. Thanks a lot to all of them.

olsr_example.tcl
um-olsr-2.33_v0.8.8.patch by Damian Philipp.
um-olsr-2.34_v0.8.8.patch by Damian Philipp.
um-olsr-2.35_v0.8.8.patch by Andrey Lyubimov.

Installation

I assume that you have downloaded and unpackaged the allinone distribution of ns-2 (any of the versions supported by UM-OLSR). Copy um-olsr-0.8.8.tgz (substitute “0.8.8″ for your UM-OLSR version number) into ns-allinone-2.29/ns-2.29/ (substitute “2.29″ for your ns-2 version number), and then do:$ cd ns-allinone-2.29/ns-2.29/ $ tar zxvf um-olsr-0.8.8.tgz $ ln -s ./um-olsr-0.8.8 ./olsr $ patch -p1 < olsr/um-olsr_ns-2.29_v0.8.8.patch

If you had not installed ns-2 yet, then do the following:
$ cd ..
$ ./install
On the other hand, if you are installing UM-OLSR on a running installation of ns-2:
$ ./configure
$ make distclean
$ ./configure
$ make
Note that the code should work on most ns-2 releases, but only patches for some versions are provided. If you need UM-OLSR on a different ns-2 version, just create the appropriate patch and share it if you want.
Using UM-OLSR can be used like any other routing agent in ns-2, so you can use the node-configcommand to attach an OLSR routing agent to the mobile nodes which are to be created.$ns_ node-config -adhocRouting OLSR
After creating your mobile nodes, you can configure each UM-OLSR routing agent individually or all at once. But first we will see the available configuration options and their default value.
debug_ : Print debugging messages on stdout (false).
use_mac_ : Enable link-layer feedback (false).
willingness_ : Set the willingness for forwarding data packets on behalf of other nodes (WILL_DEFAULT = 3).
hello_ival_ : Set the interval of HELLO messages transmission (2 sec).
tc_ival_ : Set the interval of TC messages transmission (5 sec).
mid_ival_ : Set the interval of MID messages transmission (5 sec). This has no actual effect in the simulation, since multiple interfaces are not supported.

In oder to configure all agents, write sentences like these:
Agent/OLSR set debug_ true
Agent/OLSR set hello_ival_ 3
In order to configure a single agent:
set ra [$mobilenode agent 255]
$ra set use_mac_ true
$ra set tc_ival_ 6
By default, every UM-OLSR packet may piggyback up to 4 OLSR messages. You can change this value by redefining the OLSR_MAX_MSGS constant and recompiling the simulator. For the simulation results, the length of IPv4 addresses are assumed by default. If you prefer the length of IPv6 addresses, define OLSR_IPv6 and compile again.
           Once you have performed a simulation, you get a trace file where you can see what happened during the execution. Let us see with some examples the format of the traces generated by UM-OLSR. Following examples use the classic notation of ns-2 trace files. However, “tagged” and “new trace” formats are also supported.
s 21.537326976 _0_ RTR  --- 98 OLSR 56 [0 0 0 0] -------
 [0:255 -1:255 32 0] [1 12 [HELLO 0 0 12]]
The line above indicates that node 0 is sending an OLSR packet (size = 56 bytes) which contains one HELLO message. Specific information about the OLSR packet is by the end of the line (inside the final brackets): number of contained messages, packet sequence number, and the list of OLSR messages. Then we find information about the messages themselves: type, originator address, hop count and message sequence number.
r 13.833447485 _2_ RTR  --- 45 OLSR 84 [0 ffffffff 1 800] -------
 [1:255 -1:255 32 0] [2 10 [HELLO 1 0 10][TC 1 0 11]]

The example above shows the reception of a packet which piggybacks two messages, one HELLO and one TC. Information about each one is also shown. If you need further details about the ns-2 trace formats, please see the ns-2 manual.

courtesy:mohit p thahiliani