Hi All, Our website moved to a new URL. Please bookmark the new link: https://ns2bloggers.blogspot.com/

Thursday, 2 December 2021

Pareto On/Off Traffic Generator

  The Pareto On/Off Traffic Generator (POO_Traffic) is a traffic generator (an application) embodied in the OTcl class Application/Traffic/Pareto. POO_Traffic generates traffic according to a Pareto On/Off distribution. Packets are sent at a fixed rate during on periods, and no packets are sent during off periods. Both on and off periods are taken from a Pareto distribution with constant size packets. These sources can be used to generate aggregate traffic that exhibits long range dependency. For other traffic generators, refer to the NS manual.


  • Usage Example
  • A new Pareto On/Off traffic generator can be created as follows:

            set p [new Application/Traffic/Pareto]
            $p set burst_time_ 500ms
            $p set idle_time_ 500ms
            $p set rate_ 200k
            $p set packetSize_ 210
            $p set shape_ 1.5


  • Detailed Explanation
    1. Input parameters:
    2.   burst_time_ : Mean On (burst) time
        idle_time_  : Mean Off (idle) time
        rate_       : Send rate during burst
        packetSize_ : Packet size (fixed application frame size)
        shape_      : Pareto shape parameter
        
    3. Initial computation:
    4.   interval = packetSize_ * 8 / rate_
        burstlen = burst_time_ / interval (in packets of given packetSize_)
        
    5. In each On/Off round, the following two (independent) Pareto random variables are computed:
        next_burstlen  : # of packets to be transmitted in the next burst period
                         (ex: next Web object size in packets of given packetSize_)
        next_idle_time : next idle period length in seconds
                         (ex: next think time)
        
    6. Pareto Traffic Generator algorithm:
       
      1. Compute next_burstlen given the mean burstlen and the Pareto shape_ parameter.
      2. Send all next_burstlen packets (each packet transmission interval is interval seconds).
      3. Compute the next_idle_time using the mean idle_time_ and the Pareto shape_ parameter.
      4. Go to sleep for next_idle_time and go back to step 1.
         
    7. Pareto Distribution:
    8. In general, if X is a random variable from a Pareto distribution
      (let f be the pdf, and E be the expected value)

        f(x) = a *ba / xa + 1 for x ≥ b

        E(X) = b *a / (a − 1) if a > 1

      where, a is called the Pareto "shape parameter" (shape_) and b is called the Pareto "scale parameter".

    9. How Pareto is used in the Pareto Traffic Generator:
      (The Pareto shape_ parameter is denoted as a in the following equations.)
      • burstlen    = E(X) = b1 *a / (a − 1)
        idle_time_ = E(Y) = b2 *a / (a − 1)

      Therefore:

        b1 = burstlen * (a − 1) / a
        b2 = idle_time_ * (a − 1) / a

      NS has a Pareto random number generator that takes the scale and shape parameter:

            double pareto(double scale, double shape)
        
      When the Pareto traffic generator needs to compute next_burstlen, it does:
            int next_burstlen = int(pareto(b1, a) + 0.5);
            /* next_burstlen should be at least 1 packet */
            if(next_burstlen == 0) next_burstlen = 1;
        
      When the Pareto traffic generator needs to compute next_idle_time, it does:
            double next_idle_time = pareto(b2, a);
        

  • Discussion
  • The Pareto traffic generator can be used as a Web traffic generator assuming that Web object sizes form a Pareto distribution. The NS default Pareto shape_ parameter (or a) is 1.5. However, it is uncertain if that 1.5 makes sense for Web object size distribution.

    To find a reasonable Pareto shape_ parameter for Web object sizes, one should sample Web object sizes during transmissions (or borrow the results other research), draw the pdf of the samples and compute the mean object size (i.e., E(X)). Since E(X) can be computed from the collected data, the theoretical f(x) should be:

      f(x) = g(xa)

    Then, one should be able to find a that makes the f(x) closest to the pdf of the measured Web object samples.

    Wednesday, 13 October 2021

    NS2 INSTALLATION IN KALI LINUX

     Hey, This post explains the installation of NS2 in Kali Linux. Lets start from scratch.


    KaliLinux is a Debian-derived Linux distribution designed for digital forensics and penetration testing. It was developed by Mati Aharoni and Devon Kearns of Offensive Security through the rewrite of BackTrack, their previous information security testing Linux distribution based on Knoppix. Originally, it was designed with a focus on kernel auditing, from which it got its name Kernel Auditing Linux. The name is sometimes incorrectly assumed to come from Kali the Hindu goddess. The third core developer, RaphaĆ«l Hertzog, joined them as a Debian expert.

    Kali Linux is based on the Debian Testing branch. Most packages Kali uses are imported from the Debian repositories.

    Kali Linux's popularity grew when it was featured in multiple episodes of the TV series Mr. Robot. Tools highlighted in the show and provided by Kali Linux include Bluesniff, Bluetooth Scanner (btscanner), John the Ripper, Metasploit Framework, Nmap, Shellshock, and Wget.

    The tagline of Kali Linux and BackTrack is "the quieter you become, the more you are able to hear", which is displayed on some backgrounds.

    Requirements

    Kali Linux requires:

    • A minimum of 20GB hard disk space for installation depending on the version, Version 2020.2 requires at least 20GB.
    • A minimum of 2GB RAM for i386 and AMD64 architectures.
    • A bootable CD-DVD drive or a USB stick.
    • A minimum of an Intel Core i3 or an AMD E1 processor for good performance.

    The recommended hardware specification for a smooth experience are:

    • 50 GB of hard disk space, SSD preferred.
    • At least 2048 MB of RAM.

    Supported Platforms

    Kali Linux is distributed in 32-bit and 64-bit images for use on hosts based on the x86 instruction set and as an image for the ARM architecture for use on the Beagle Board computer and Samsung's ARM Chromebook.

    The developers of Kali Linux aim to make Kali Linux available for even more ARM devices.

    Kali Linux is available on Windows 10, on top of Windows Subsystem for Linux (WSL). The official Kali distribution for Windows can be downloaded from the Microsoft Store.


    Installation of NS2

    •  Update and Verify installed package: Open the terminal by press ctrl+alt+T buttons or search from the installed software list. Type following command; 
    sudo apt update
    • Install Prerequisites: To install prerequisites type and execute the given below command;
    sudo apt-get install gcc g++ python python-dev mercurial bzr gdb valgrind gsl-bin libgsl0-dev libgsl0ldbl flex bison tcpdump sqlite sqlite3 libsqlite3-dev libxml2 libxml2-dev libgtk2.0-0 libgtk2.0-dev uncrustify doxygen graphviz imagemagick texlive texlive-latex-extra texlive-generic-extra texlive-generic-recommended texinfo dia texlive texlive-latex-extra texlive-extra-utils texlive-generic-recommended texi2html python-pygraphviz python-kiwi python-pygoocanvas libgoocanvas-dev python-pygccxml
    • Install NS2: To install the ns-2.35 version, execute the command in the terminal.
    sudo apt-get install ns2

    NS2 INSTALLATION IN WINDOWS 10 & WINDOWS 11 USING WSL

     Hey All, this post explains how to install NS2 easily using Windows OS using Windows Subsystem for Linux.  Before starting the topic, lets talk a little about WSL oe Windows Subsystem for Linux.

    Windows Subsystem for Linux

    The Windows Subsystem for Linux lets developers run a GNU/Linux environment -- including most command-line tools, utilities, and applications -- directly on Windows, unmodified, without the overhead of a traditional virtual machine or dual-boot setup.

    Step 1:  Turn on developer mode

    Search > Developer Settings > Turn on Developer mode

    Step 2: Download Ubuntu from Store

    Go to Microsoft Store and Download Ubuntu.


    Step 3: Download and Install Xming
     
    Click here for downloading Xming.

    Step 4: Install Ubuntu

    Set Username and Password for ubuntu.

    If you get an error in installing ubuntu, Ws1RegistrationDistributuin failed with error: 0x8007019e
    It mans the windows subsystem for Linux optional component is not enabled. 
    So Turn on windows features -> windows subsystem for Linux


    It may take few minutes and reboot the system once installation completed.


    Step 5: Updating Ubuntu OS and NS2 Installation

    After reboot and Ubuntu installation, Type following commands in terminal ;
    • sudo apt update
    • sudo apt-get install ns2
    • sudo apt-get install nam
    • sudo apt-get install gedit
    • sudo apt install tcl
    Step 6: Directory Change

    Change your directory of ubuntu
    • cd/mnt/OS Drive Name/Users/UserProfile/Desktop
    • cd folder_name_in_Desktop
    • In the first screen, select → Full Screen
    • In the second screen, select → Start no client
    • Rest of the screens just click on next and finish the config setup
    • The window closes and it's done
    Make sure server is running.

    • Type export DISPLAY=0:0 in Ubuntu
    •  gedit filename.tcl (Xming application will be opened where you can type your program, save it, and close)
    • ns filename.tcl
    The Network Simulator will be opened.

    Thursday, 7 October 2021

    NS2 INSTALLATION ON UBUNTU 18.04

      Hello, this post explains how to install ns2 in Ubuntu 18.04. 


    1) First you have to download ns2 all-in-one package from following link;

    2) Extract the downloaded zip file 'ns-allinone-2.35.tar.gz file' to home folder.

    3) Now you need to download some essential packages for ns2,these packages can be downloaded by using the following commands : applications>accessories>terminal or dashhome>terminal  and then type the below lines one by one on the terminal window

    • sudo apt-get update
    • sudo apt-get dist-upgrade
    • sudo apt-get update
    4) Install the basic libraries;
    • sudo apt install build-essential autoconf automake libxmu-dev
    5) Install gcc and g++ and for that please do following;
    open the file using sudo mode
    • sudo nano /etc/apt/sources.list
    Include the following line in list; 
    • deb http://in.archive.ubuntu.com/ubuntu bionic main universe
    then open terminal and execute commands;
    • sudo apt update
    • sudo apt install gcc-4.8 g++-4.8
    For NS2.35 you can use gcc and g++ version up to 5.4
    if 4.8 isn't working try installing gcc-5 and g++5. then at the step where you modify the Makefile.in , use gcc-5 instead of gcc-4.8 and so on.

    6) Navigate to the ns2 folder and  modify the following make files.
    1. ~ns-2.35/Makefile.in
    • Change @CC@ to gcc-4.8
    • Change @CXX@ to g++-4.8
    browse following files and replace everywhere as shown;
    1. ~nam-1.15/Makefile.in
    2. ~xgraph-12.2/Makefile.in
    3. ~otcl-1.14/Makefile.in
    • change @CC@ to gcc-4.8
    • change @CPP@ or @CXX@ to g++-4.8
    Note: If you have a different gcc or g++ version, please change accordingly.
    Now Open the following file: ~ns-2.35/linkstate/ls.h and change line no 137;
    • void eraseAll() { erase(baseMap::begin(), baseMap::end()); }
    to
    • void eraseAll() { this->erase(baseMap::begin(), baseMap::end()); }
    7) Now change your directory and type the following codes in the command window to install NS2 from a new terminal. 
    • cd ns-allinone-2.35/
    • ./install
      The installation procedure will take a few minutes..........

    8) For setting the path; Open a new Terminal and type
    • gedit .bashrc 
    Paste the following lines
    • export PATH=$PATH:/home/<username>/ns-allinone-2.35/bin:/home/<username>/ns-allinone-2.35/tcl8.5.10/unix:/home/<username>/ns-allinone-2.35/tk8.5.10/unix
    • export LD_LIBRARY_PATH=/home/<username>/ns-allinone-2.35/otcl-1.14:/home/<username>/ns-allinone-2.35/lib
    9) Save and close the text editor and then type the following command on the terminal
    • source  .bashrc
    10) Close the terminal window and start a new terminal window and now change the directory to ns-2.35 and validate ns-2.35 by executing the following command ( it takes 30 to 45 minutes)
    • cd ns-2.35
    • ./validate
    11) If the installation is successful, then you will be able to see % at the command prompt while typing the following command
    • ns
    12) Now type
    • exit

    NS2 INSTALLATION IN UBUNTU 20.04

     Hello, this post explains how to install ns2 in Ubuntu 20.04. 

    1) First you have to download ns2 all-in-one package from following link;

    2) Extract the downloaded zip file 'ns-allinone-2.35.tar.gz file' to home folder.

    3) Now you need to download some essential packages for ns2,these packages can be downloaded by using the following commands : applications>accessories>terminal or dashhome>terminal  and then type the below lines one by one on the terminal window

    • sudo apt-get update
    • sudo apt-get dist-upgrade
    • sudo apt-get update
    4) Install the basic libraries;
    • sudo apt install build-essential autoconf automake libxmu-dev
    5) Install gcc and g++ and for that please do following;
    open the file using sudo mode
    • sudo nano /etc/apt/sources.list
    Include the following line in list; 
    • deb http://in.archive.ubuntu.com/ubuntu bionic main universe
    then open terminal and execute commands;
    • sudo apt update
    • sudo apt install gcc-4.8 g++-4.8
    For NS2.35 you can use gcc and g++ version up to 5.4
    if 4.8 isn't working try installing gcc-5 and g++5. then at the step where you modify the Makefile.in , use gcc-5 instead of gcc-4.8 and so on.

    6) Navigate to the ns2 folder and  modify the following make files.
    1. ~ns-2.35/Makefile.in
    • Change @CC@ to gcc-4.8
    • Change @CXX@ to g++-4.8
    browse following files and replace everywhere as shown;
    1. ~nam-1.15/Makefile.in
    2. ~xgraph-12.2/Makefile.in
    3. ~otcl-1.14/Makefile.in
    • change @CC@ to gcc-4.8
    • change @CPP@ or @CXX@ to g++-4.8
    Note: If you have a different gcc or g++ version, please change accordingly.
    Now Open the following file: ~ns-2.35/linkstate/ls.h and change line no 137;
    • void eraseAll() { erase(baseMap::begin(), baseMap::end()); }
    to
    • void eraseAll() { this->erase(baseMap::begin(), baseMap::end()); }
    7) Now change your directory and type the following codes in the command window to install NS2 from a new terminal. 
    • cd ns-allinone-2.35/
    • ./install
      The installation procedure will take a few minutes..........

    8) For setting the path; Open a new Terminal and type
    • gedit .bashrc 
    Paste the following lines
    • export PATH=$PATH:/home/<username>/ns-allinone-2.35/bin:/home/<username>/ns-allinone-2.35/tcl8.5.10/unix:/home/<username>/ns-allinone-2.35/tk8.5.10/unix
    • export LD_LIBRARY_PATH=/home/<username>/ns-allinone-2.35/otcl-1.14:/home/<username>/ns-allinone-2.35/lib
    9) Save and close the text editor and then type the following command on the terminal
    • source  .bashrc
    10) Close the terminal window and start a new terminal window and now change the directory to ns-2.35 and validate ns-2.35 by executing the following command ( it takes 30 to 45 minutes)
    • cd ns-2.35
    • ./validate
    11) If the installation is successful, then you will be able to see % at the command prompt while typing the following command
    • ns
    12) Now type
    • exit

    VMWARE WORKSTATION PLAYER IN WINDOWS

     VMware Workstation Player is the limited capability free (for non-commercial use) version of VMware Workstation Pro. That is, it is just as VMware Workstation Pro with lesser functionality and free for personal use. But what is available is enough for most of the home users.

    VMware Workstation Player formally known as VMware Player is a Virtualization software used to run multiple virtual machines on the same hardware. Its available for both Windows and Linux based operating systems. It runs on 64 bit operating system, which means that if you have 32 bit operating system, you will not be able to use it.

    Earlier, VMware Player was distinct from VMware Workstation. But now they have been merged. That is to say, VMware Player is now available as VMware Workstation Player which shares the same core as the VMware Workstation. The only difference is that, VMware Workstation provides all the features, where as VMware Workstation Player is a stripped down version of VMware Workstation pro and does not have all the features.

    But the good part is that VMware Player is free for non commercial use and provides enough functionality for Home and non commercial users. It provides enough features to be able to run a virtual machine on a home computer.

    VMware Workstation Player is not a commercially supported application. That is VMware does not provide support for it. But there are sufficient help available online. Once you start using it, you will see that the way you use it is similar to VMware Workstation pro .


    VMware Workstation player is available free of cost. Earlier it was not free, but I see that VMware has made it available for free for non Commercial users. For commercial usage, VMware Workstation Pro is more suitable.


    This is the download page for all the VMware products. You will have to scroll down to VMware Player option to see the download link. From here you download any VMware Products. This link will always remain valid even when newer versions of the products are released.

    This is the direct link to download VMware Player 16 for Windows 10. Please note that this is a 64 bit application. VMware no longer supports 32 bit Operating Systems.

    In this blog, I will be using VMware Player Version 16.1.0, Installer file name is VMware-player-16.1.0-17198959.exe and is about 220 MB in size

    Run the installer

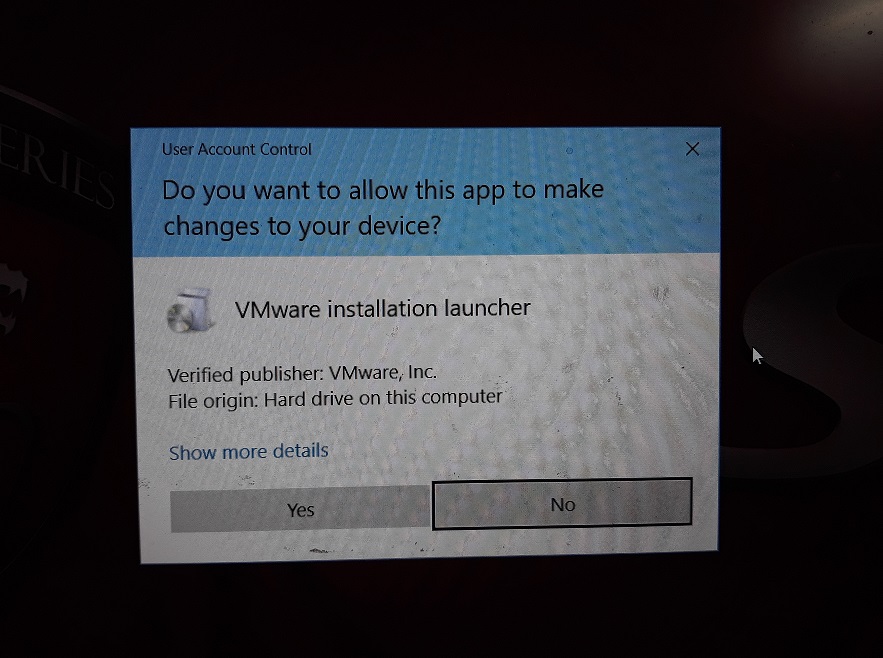
    Start the installer by double clicking it. You might see User Account Control Warning. Click Yes to continue.

    VMware Player 15 - Installation - User Account Control Warning

    VMware Player 15 – Installation – User Account Control Warning


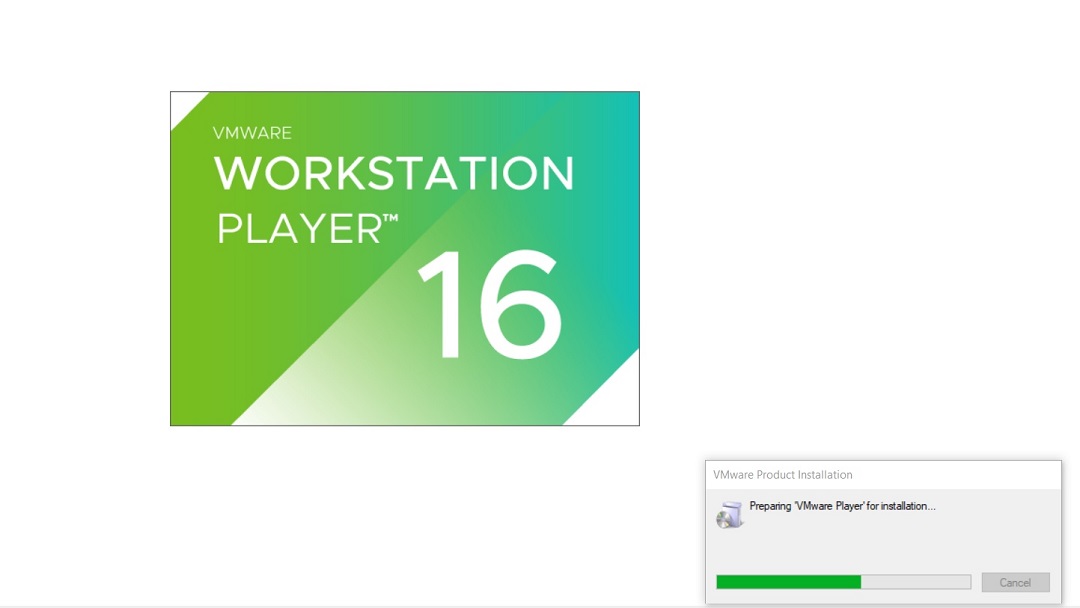
    Then, you will see a splash screen. It will prepare the system for installation and then the installation wizard opens.

    VMware Player 16 Installation - Initial Splash Screen

    VMware Player 16 Installation – Initial Splash Screen

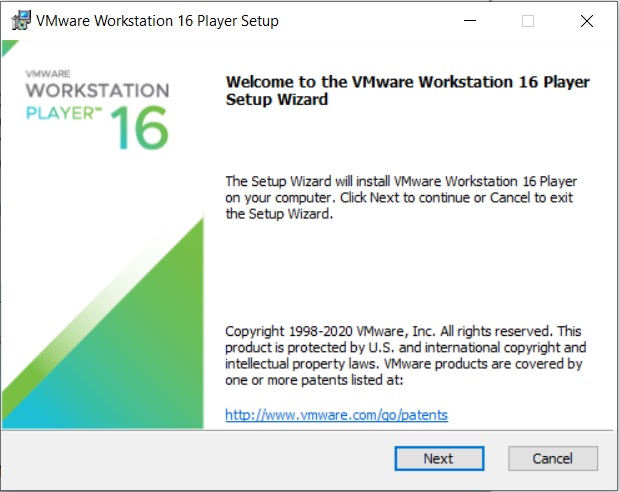
    VMware Player 16 Installation – Setup Wizard

    VMware Player 16 Installation – Setup Wizard


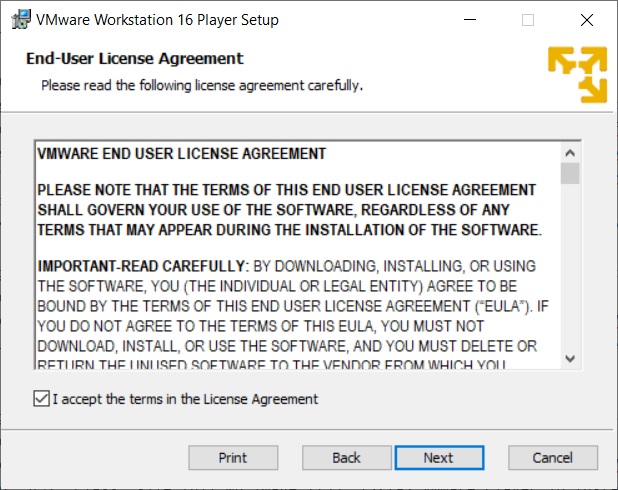
    Click next and accept the license terms and click next again to move on to the next screen.

    VMware Player 16 Installation - End User Agreement

    VMware Player 16 Installation – End User Agreement

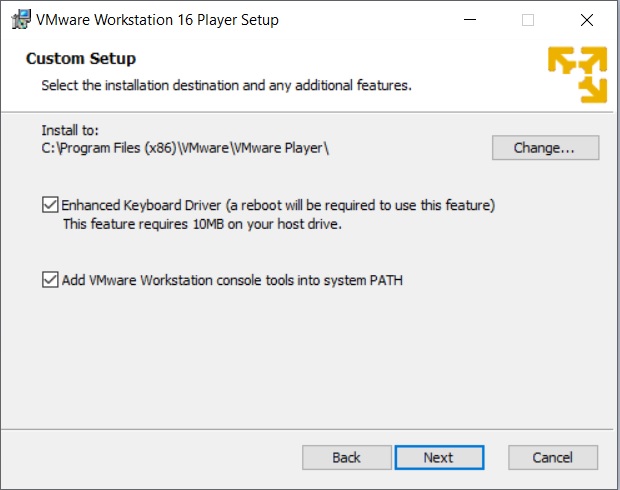
    Custom setup – Enhanced Keyboard driver and Installation directory

    In this dialog box, please select the folder in which you want to install the application. I leave it as it is. Also check the box Enhanced Keyboard Drivers option. Click next.

    VMware Player 16 Installation - Custom Setup

    VMware Player 16 Installation – Custom Setup

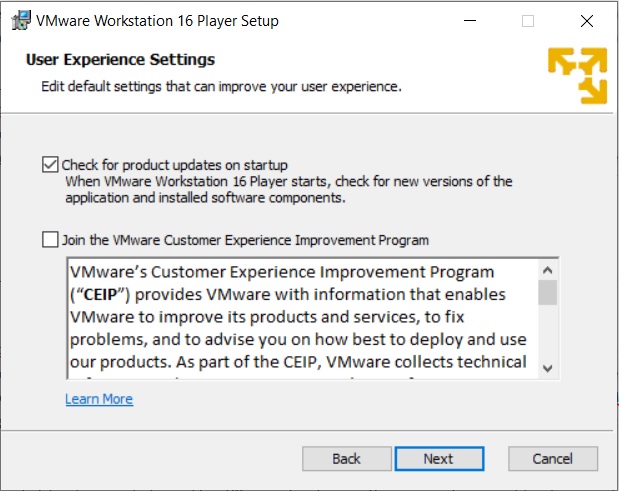
    User Experience Settings

    Check the options for Check the product update at Startup and Join the VMware Customer Program. I normally leave it as it is. You can unchecked it if you so desire. Click next

    VMware Player 16 Installation - User Experience Settings

    VMware Player 16 Installation – User Experience Settings

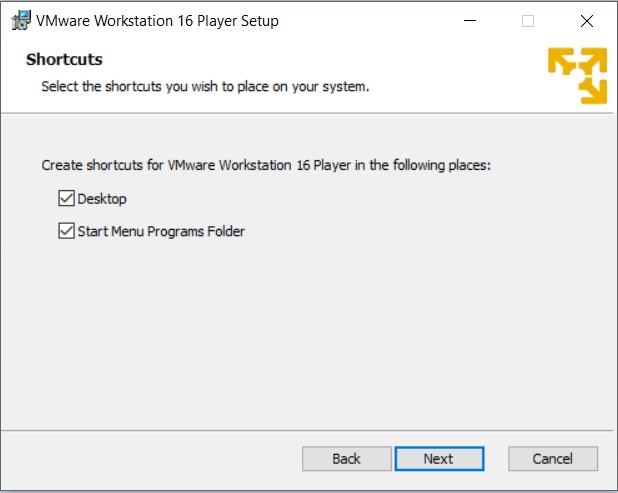
    Select where the shortcuts will be installed

    Check the box where the shortcut to run the application will be created. I leave it as it is. Click on next.

    VMware Player 16 Installation – Shortcuts

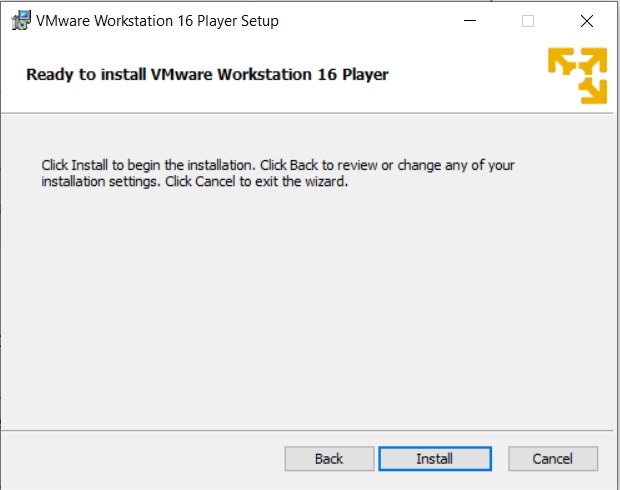
    Ready to install

    Now the installation wizard is ready to install. Click on install to begin the installation.

    VMware Player 16 Installation - Ready to Install

    VMware Player 16 Installation – Ready to Install


    Installation begins, wait for it to complete.

    After sometime, you will see installation compete message. You are done.

    VMware Player 16 Installation - Installation Complete

    VMware Player 16 Installation – Installation Complete


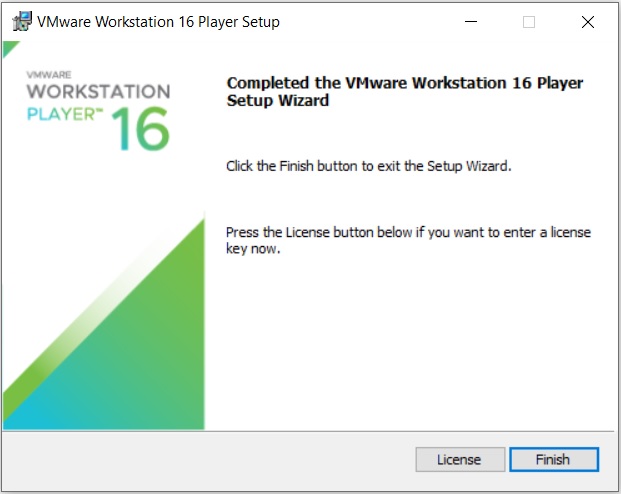
    Click on Finish to Complete the installation.

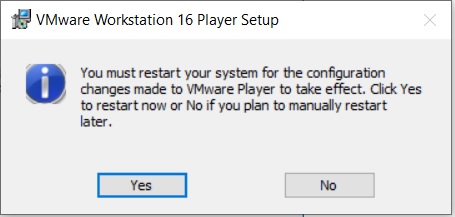
    You will be asked to restart your system. Click on Yes to restart. Click No, if you want to restart later. But you must restart before using the application, else some features will not work properly.

    VMware Player 16 Installation - Reboot Required

    VMware Player 16 Installation – Reboot Required

    License

    Now Run the application. You should see a desktop icon. Douple click on that or use the start menu to navigate to VMware Player option.

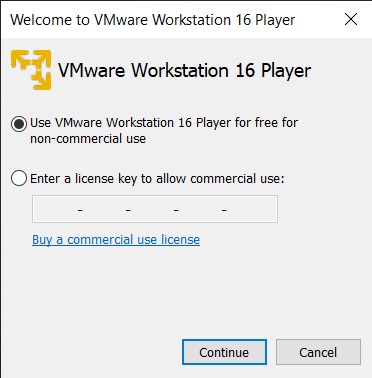
    Once you run the application for the first time, you will be asked for licence. Select the option Use VMware Workstation Player 16 for for free for non commercial use.

    Click continue.

    VMware Player 16 Installation - License

    VMware Player 16 Installation – License

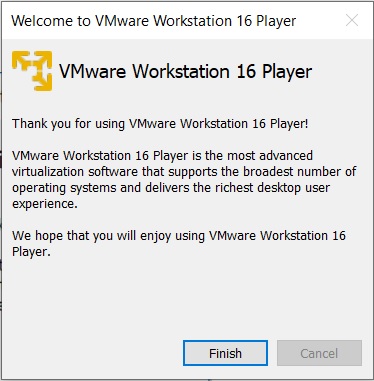
    Click on Finish.

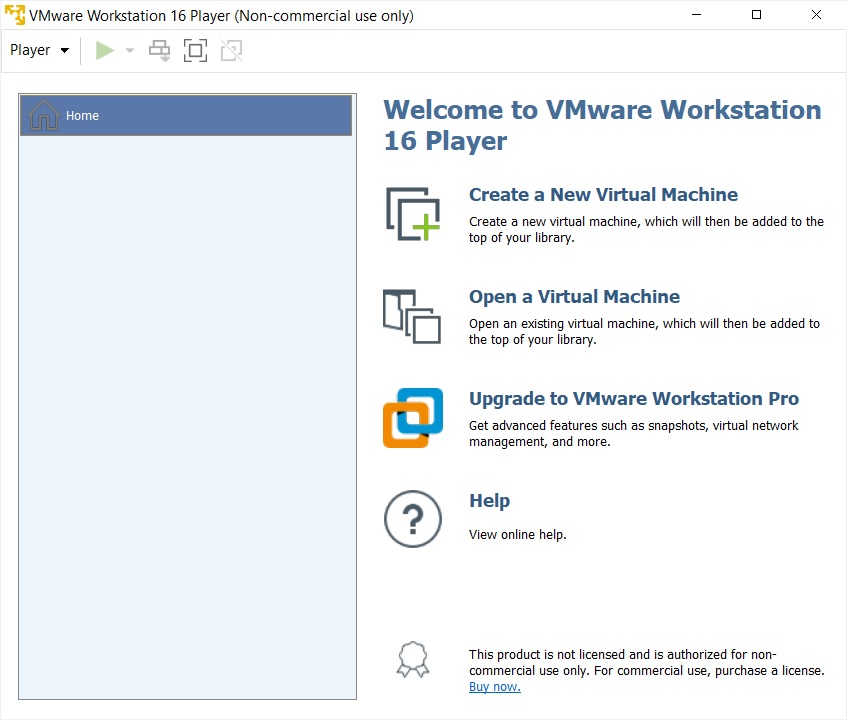
    Now you will see VMware Workstation Player 16 ready to be used for free for non-commercial purpose.

    VMware Player 16 - Home Screen

    VMware Player 16 – Home Screen

    After Installing VMWare Workstation, you can use this link for installing Linux Software and NS2 Software.

    SELFISH NODES IN ADHOC NETWORKS

     Hey All, In this post we discuss about selfish nodes and how to simulate selfish node scenario using ns2. 

    MANET is self-constrained network, each node should collaborate with each other to perform functions of the network but sometimes node may behave selfishly to conserve their resource like batter power, bandwidth etc. Such nodes are called selfish node and selfishness disturb the network and take away the network from their regular mission. 

    The term selfish node mainly comes from a  specific class of AdHoc Networks known as cooperative networks,  where different autonomous and as well as heterogeneous nodes (possibly owned by different individuals)  form a network and agree to forward each others packet   in cooperative manner.
    The biggest problem in this type of network  is "selfish node problem", where some may start dropping the packets of others just for its own benefit (to save the power)
    There are two commonly known techniques to with the selfish node problem:  
    1. Reputation based
    2. Incentive based 
    3. The combination of both
    This particular area of research is closely related with game theoretic approaches to solve as well analyze the problem.


    Selfish node does not forward any data packets to other nodes except itself. Selfish nodes helps to optimize their own gain, with neglect for the welfare of other nodes in a network. Selfish Nodes cooperates during the route discovery cycle to maintain a concise routing table and to be present in other routing tables in a network.

    Behavior of selfish nodes

    • It does not forward the RREQ messages.
    • Do not forward data messages.
    • Delayed forwarding RREQ messages.
    • Do not forward RREP messages.
    Code for Selfish Nodes

    #define options
    set val(chan) Channel/WirelessChannel
    set val(prop) Propagation/TwoRayGround
    set val(netif) Phy/WirelessPhy
    set val(mac) Mac/802_11
    set val(ifq) Queue/DropTail/PriQueue
    set val(ant) Antenna/OmniAntenna
    set val(ll) LL
    set val(ifqlen) 150
    set val(nn) 10
    set val(rp) DSR
    set val(X) 600
    set val(Y) 600
    set val(cstop) 50
    set val(stop) 50
    set val(cp) "scen-20-10"

    # Initialize Global Variables
    set ns_ [new Simulator]

    set tracefd [open DSR.tr w] $ns_ trace-all $tracefd
    set namtrace [open DSR.nam w] $ns_ namtrace-all-wireless $namtrace $val(X) $val(Y)
    #set up top
    set topo [new Topography] $topo load_flatgrid $val(X) $val(Y)
    # Create God
    set god_ [create-god $val(nn)] #create channel
    set chan_1_ [new $val(chan)] set chan_2_ [new $val(chan)]

    if {$val(rp) == "DSR"
    } {

    set val(ifq) CMUPriQueue
    } else {

    set val(ifq) Queue/DropTail/PriQueue
    }
    #configure nodes
    $ns_ node-config -adhocRouting $val(rp) \
    -llType $val(ll) \
    -macType $val(mac) \
    -ifqType $val(ifq) \
    -ifqLen $val(ifqlen) \
    -antType $val(ant) \
    -propType $val(prop) \
    -phyType $val(netif) \
    -topoInstance $topo \
    -agentTrace ON \
    -routerTrace ON \
    -macTrace ON \
    -movementTrace ON \
    -channel $chan_1_
    # create nodes
    for {
    set i 0
    } {
    $i &lt; $val(nn)
    } {
    incr i
    } {

    set node_($i) [$ns_ node] $node_($i) random-motion 0;
    }
    puts "loading random connection pattern..."
    source $val(cp)
    source "cbr"
    #Define initial node position
    for {
    set i 0
    } {
    $i&lt;$val(nn)
    } {
    incr i
    } {
    $ns_ initial_node_pos $node_($i) 30
    }
    #$ns_ at 0.0 "[$node_(4) set ragent_] hacker"
    for {
    set i 0
    } {
    $i&lt;4
    } {
    incr i
    } {
    $ns_ at $val(cstop) "$cbr_($i) stop"
    }
    for {
    set i 0
    } {
    $i&lt;$val(nn)
    } {
    incr i
    } {
    $ns_ at $val(stop).000000001 "$node_($i) reset";
    }
    $ns_ at 0.01 "$node_(0) add-mark m brown circle"
    $ns_ at 0.01 "$node_(1) add-mark m brown circle"
    $ns_ at 0.01 "$node_(2) add-mark m brown circle"
    $ns_ at 0.01 "$node_(3) add-mark m brown circle"
    $ns_ at 0.01 "$node_(4) add-mark m brown circle"
    $ns_ at 0.01 "$node_(5) add-mark m brown circle"
    $ns_ at 0.01 "$node_(6) add-mark m brown circle"
    $ns_ at 0.01 "$node_(7) add-mark m brown circle"
    $ns_ at 0.01 "$node_(8) add-mark m brown circle"
    $ns_ at 0.01 "$node_(9) add-mark m brown circle"

    $ns_ at 40.5 "$ns_ trace-annotate \" NODE 0 IS DETECTED AS SELFISH NODE AT TIME 40.5\""
    $ns_ at 45.5 "$ns_ trace-annotate \" NODE 4 IS DETECTED AS SELFISH NODE AT TIME 45.5\""
    $ns_ at 45.0 "$ns_ trace-annotate \" NODE 7 IS DETECTED AS SELFISH NODE AT TIME 45.0\""
    $ns_ at 45.5 "$ns_ trace-annotate \" NODE 9 IS DETECTED AS SELFISH NODE AT TIME 45.5\""

    $ns_ at 40.5 "$node_(0) delete-mark m"
    $ns_ at 40.5 "$node_(0) add-mark m red circle"
    $ns_ at 48.5 "$node_(4) delete-mark m"
    $ns_ at 45.5 "$node_(4) add-mark m red circle"
    $ns_ at 48.5 "$node_(7) delete-mark m"
    $ns_ at 45.5 "$node_(7) add-mark m red circle"
    $ns_ at 48.5 "$node_(9) delete-mark m"
    $ns_ at 45.5 "$node_(9) add-mark m red circle"

    $ns_ at $val(stop) "finish"
    $ns_ at $val(stop).0 "$ns_ trace-annotate \"Simulation has ended\""
    $ns_ at $val(stop).00000001 "puts \"NS exiting...\"; $ns_ halt"
    proc finish {

    } {
    global ns_ tracefd namtrace
    $ns_ flush-trace
    close $tracefd
    close $namtrace
    exit 0
    }
    puts "Starting simulation..."
    $ns_ run